Anchoring:
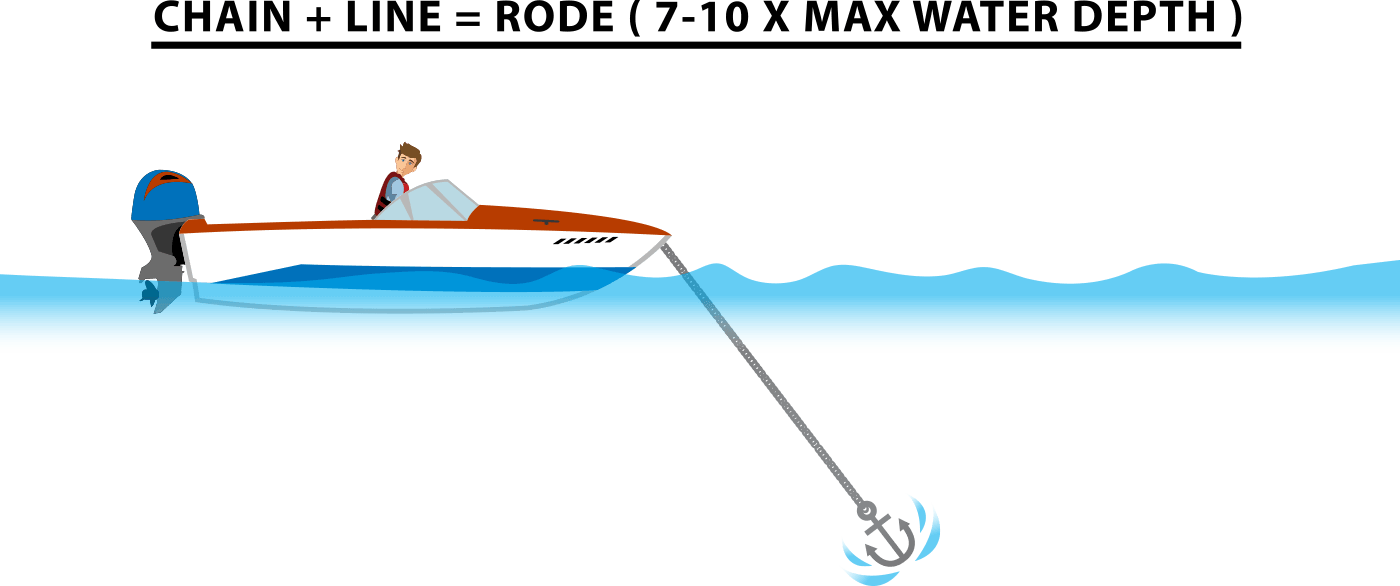
One is not required, by federal law, to keep an anchor on board, but it is recommended. If one happens to lose power, in a strong current, an anchor can significantly improve safety. When dropping anchor, remember never to drop anchor from stern since the weight could swamp or even capsize the boat. Tie the anchor to a bow cleat instead.
As a general rule, keep the anchor line (or rode) 7 to 10 times the depth of the water in which the anchor is being dropped. One will need even more rode if in bad or rough weather.
Docking:
Docking is one of the most challenging skills for a boater to learn. Remember when the wind is blowing, in one's face or at one's back, it makes a significant difference in how to approach the dock.
In one's face: If the wind is in one's face, approach the dock at a steep angle. Having the wind at one's face gives more control over maneuvering the vessel. One will want to quickly approach the dock, secure the bow, and then reverse until the stern swings into place.
At one's back: If the wind is at one's back, one will instead need to approach the dock at a shallow angle, stop, and allow the wind to drive the boat into the dock. Having the wind at one's back leaves less control.
Locks:
When navigating a lock, remember to always follow the lockmaster's instructions. They will signal when it is time to enter the lock. Military and commercial craft have priority. So, one will need to patiently wait for one's turn. Additionally, one needs to be wearing a personal floatation device, at all times, in the lock.
Aids to Navigation (ATON):
At the beginning of this chapter, we learned about the Aids to Navigation System (ATON) which uses red and green lateral markers, day-markers, and buoys to assist boaters as they navigate the water.
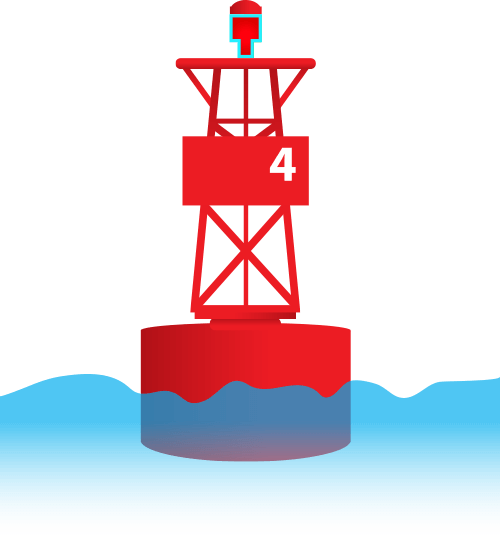 |
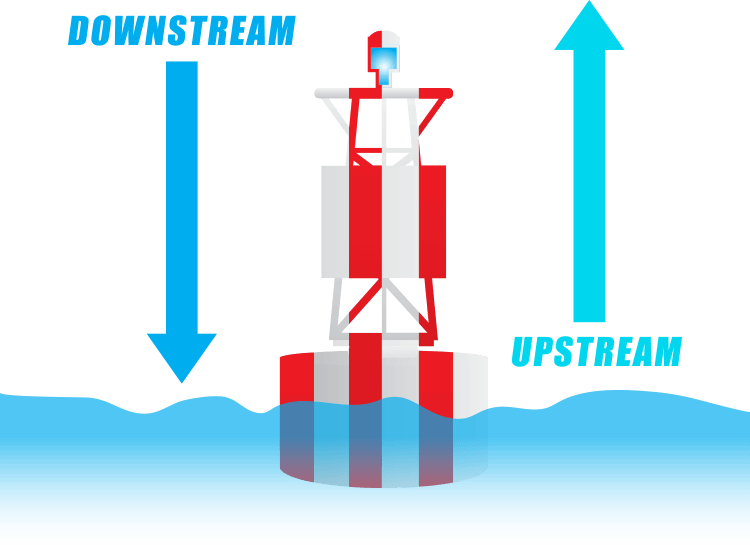
Red Lateral Marker Always keep this marker on the starboard (right) side when returning from sea. Even numbers are displayed on these markers and will increase as one heads further upstream. |
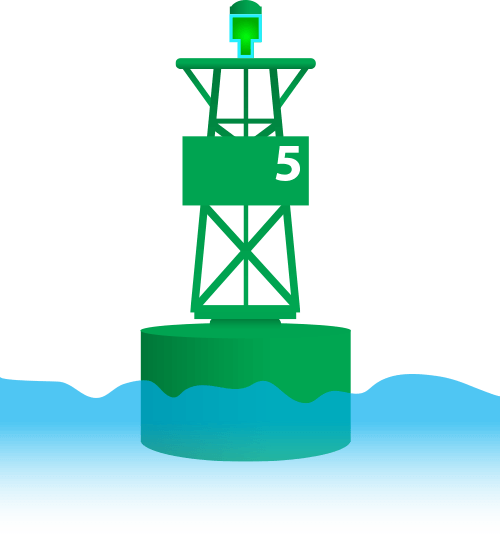 |
Green Lateral Marker Always keep this marker on the port (left) side when heading upstream or returning from sea. Odd numbers are displayed on these markers and will increase as one heads further upstream. |
If a lateral marker is both red and green, it indicates that it may be passed on either side. However, the color on top indicates the preferred channel.
A good rule to remember is "Red. Right. Returning." This saying helps one to remember to keep red markers on the right side when returning from sea, which means when heading upstream.
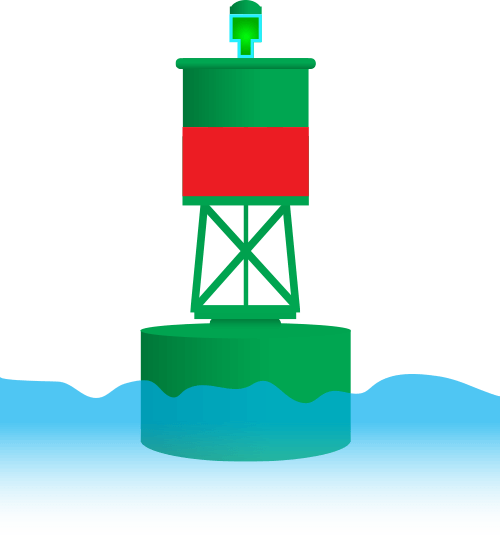 |
Junction Buoy This marker is used to indicate the main or preferred channel when a channel splits into two. One may pass these buoys on either side but the preferred channel is indicated by whichever color is on top. As an example, the buoy pictured here indicates that the right channel is preferred. Since green is the color on top one would keep it on the port (left) side when passing to head up the preferred channel. |
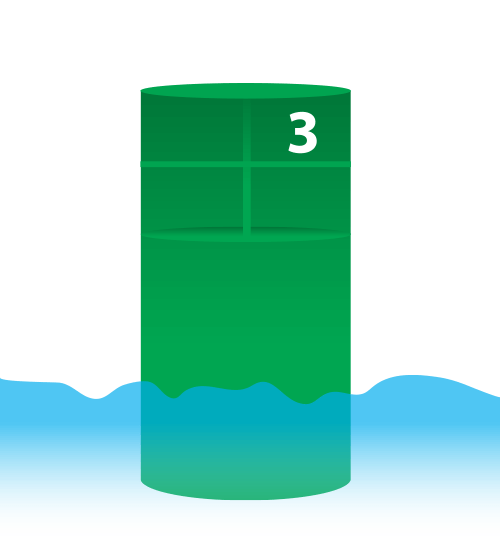 |
Can Buoy These buoys are green, cylindrical-shaped and display odd numbers. Keep these buoys on the port (left) side if heading in the upstream, or returning direction. |
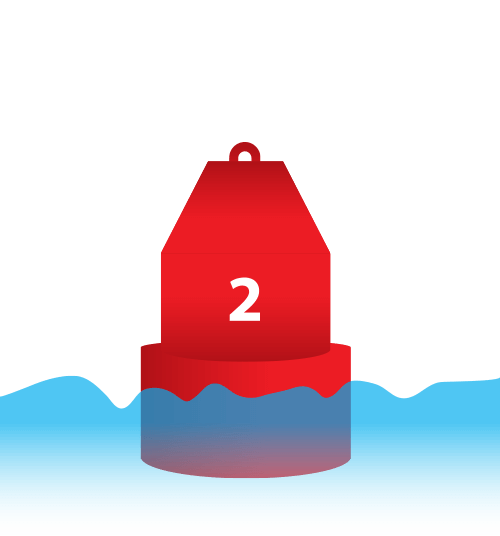 |
Nun Buoy These buoys are red, cone-shaped and display even numbers. Keep these buoys on the starboard (right) side if heading in the upstream or returning direction. |
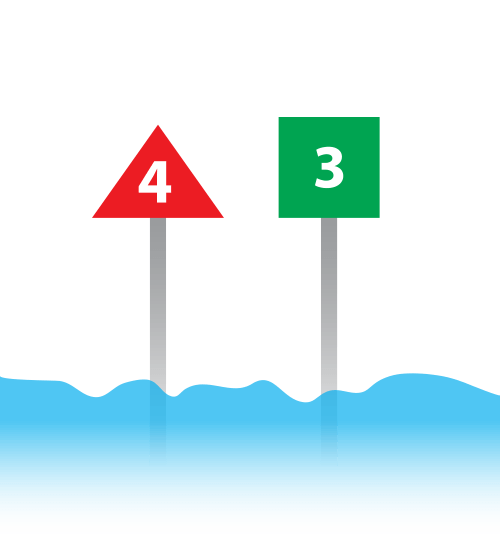 |
Day-Markers Day-markers are signs which may either be red triangles with even numbers or green squares with odd numbers. Keep red markers on the starboard side and green makers on the port side when heading upstream. |
One can tell if one is heading upstream or downstream by looking at the numbers on these markers. If the numbers are increasing as one passes them, then one is heading upstream.
Uniform State Waterways Marking System:
This system of markers is used to display important information to boaters.
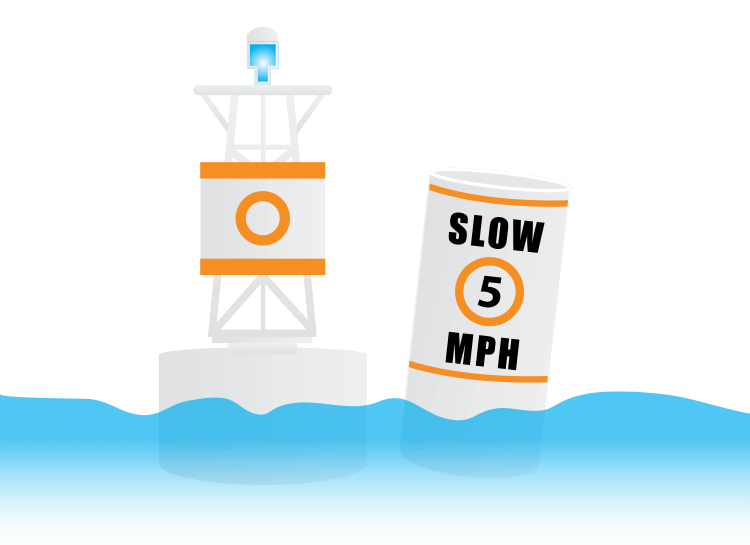 |
Control Markers (Circle) These markers indicate rules or restrictions which apply to the area. These controlled areas can have speed limits, wash restrictions, and other regulations which must be followed so always adhere to the rules within the orange circle. |
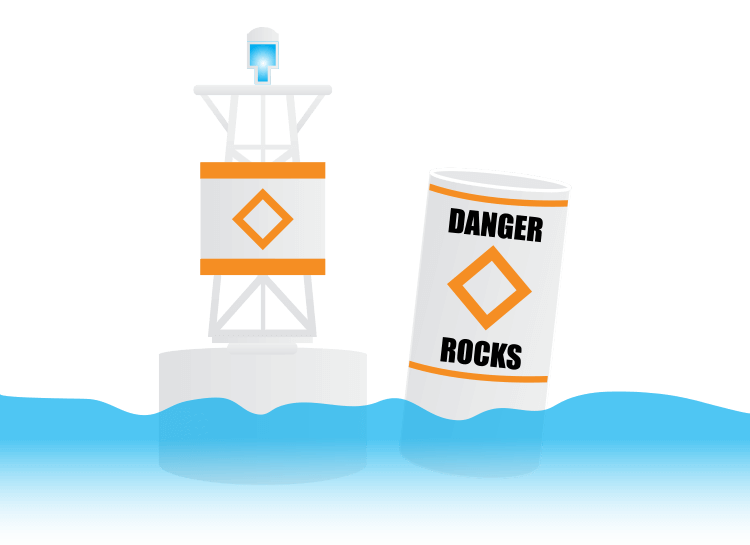 |
Hazard Markers (Diamond) These markers indicate danger and hazardous areas such as shoals and rocks. One can use the information found inside the orange diamond to help avoid these dangers. One can identify these by their orange diamonds. |
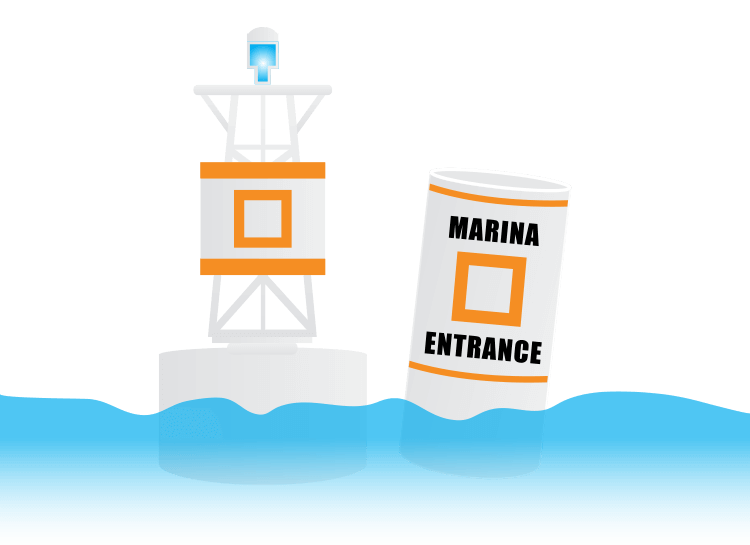 |
Informational Markers (Square) These markers give directions, distances, and locations. One may use the information found inside the square to guide navigation. These markers feature orange squares. |
 |
Keep-Out Markers (Diamond + Cross) These markers indicate a prohibited area which is closed off. For instance, these areas could be sectioned off swim areas or areas with fragile wildlife. Either way, steer clear and never cross these boundaries. These markers feature a diamond with an orange cross. |
We've also covered mooring markers, obstruction markers, safe-water markers, and diving markers which each feature with their own shape, color, or patterns. All of these markers give vital information. So, review the chapter until able to identify them reliably. Remember that a mooring marker is the only type of marker one may moor the boat to and that one should steer at least 100 feet clear of a diving marker to be safe.
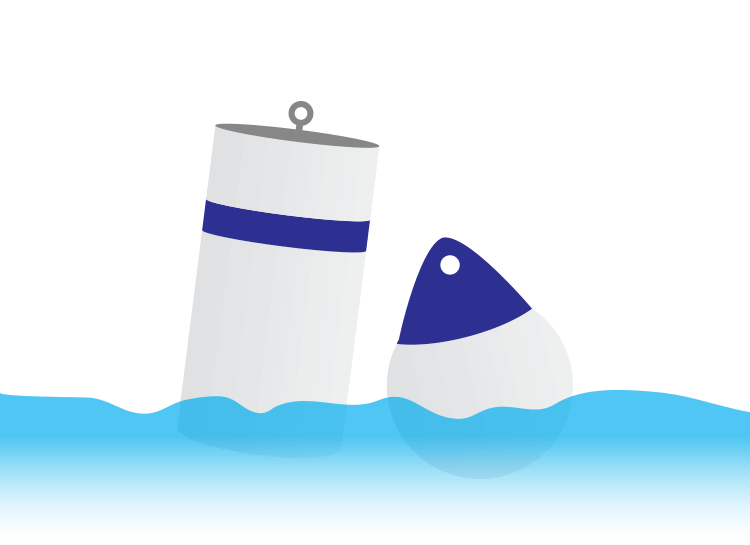 |
Mooring Markers These markers are used to secure or moor a vessel. These are the only markers which can be legally tied to a boat, so keep in mind that this marker may be attached to one. |
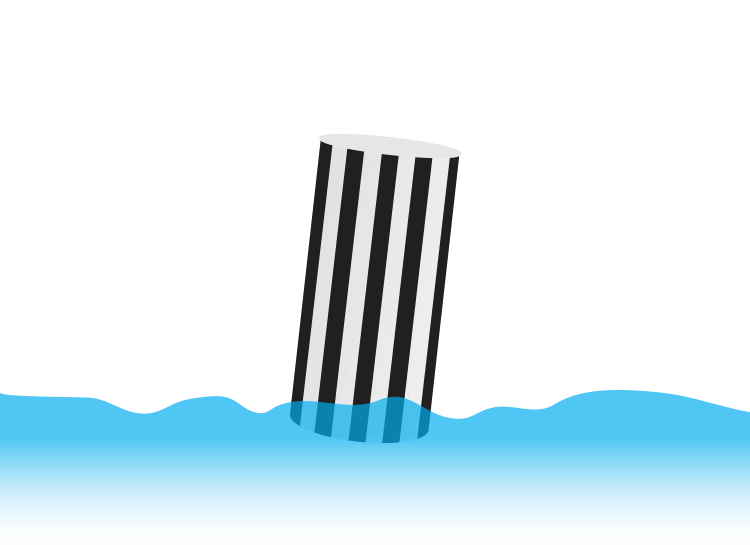 |
Obstruction Markers These markers indicate an obstruction which is concealed underwater. Never pass between this marker and the shoreline. |
 |
Safe Water Markers These markers indicate areas of safe water. These markers assist one by displaying the water which is safe to navigate and by marking the presence of channel entrances, channel centers or landfalls. One may pass these markers on either side. |
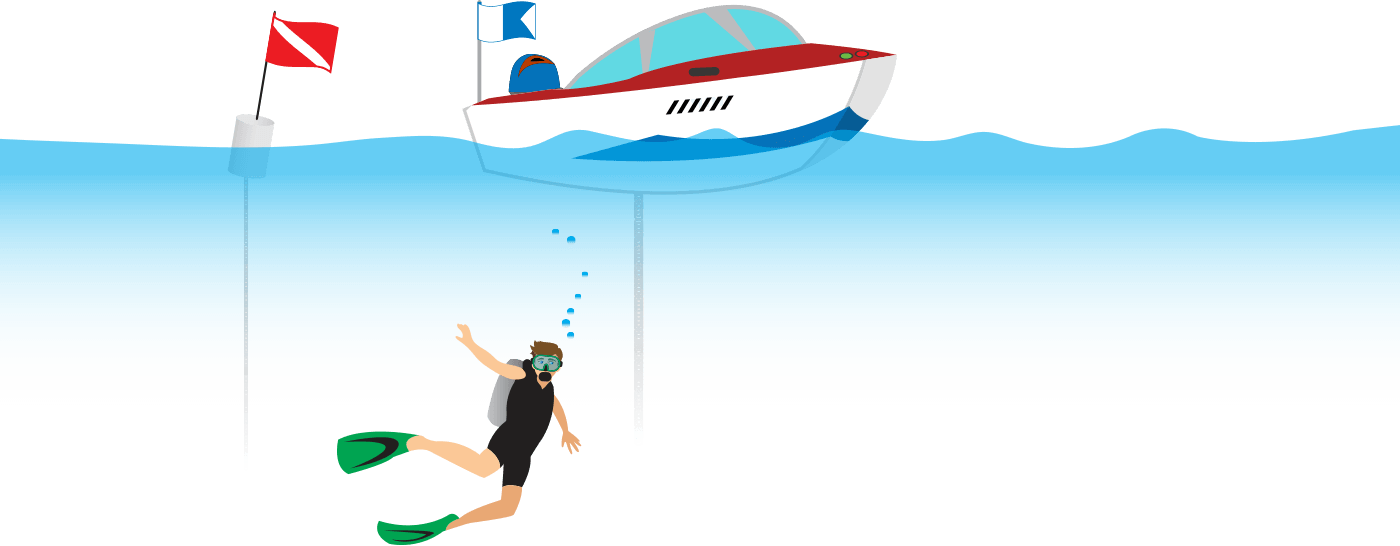 |
Diving Markers These markers indicate diving activity, in the area. Steer well clear of these. |